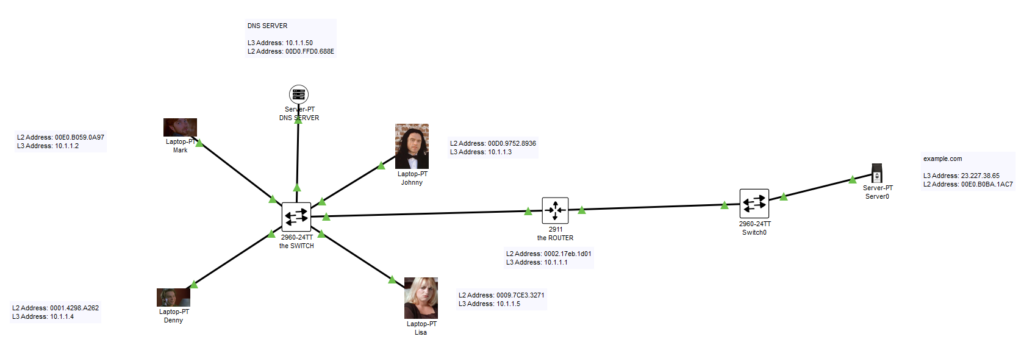
This section will cover a simple conversation between a client on a private network and accessing the internet to a different network for a website.
The typography of our network is shown here. From NetworkChucks video (src. https://www.youtube.com/watch?v=3kfO61Mensg&list=PLIhvC56v63IJVXv0GJcl9vO5Z6znCVb1P&index=6)

Firstly the client will send a HTTPS or in unlikely scenarios an HTTP packet to the web server. This is sent assuming all CAM tables are populated with the right destinations and the client’s computer knows where the website lives. So we are skipping ARP discovery and DNS.
The moment the user searches for their specified website a lot goes on. Firstly two packets are created. The first frame contains what the computer is getting ready for and the second is what it’s sending out to the switch.
As seen below, the first frame (or packet) sends out an HTTP request to the web server. For this example let’s say its example.com.

The First Frames Information.
We can start breaking down whats going on in this first important frame to the switch.
LAYER 7: This is the Application Layer. Simply put our client’s machine is using HTTPS protocol to access the web server for example.com.
LAYER 5-6: From the OSI model the Presentation and Session layers are also being used here but typically these get muxed together. More detail regarding both these layers will be demonstrated in later sections.
LAYER 4: This is the Transport Layer. In this case, we are using TCP (Transport Layer Protocol) to transport our data. More on TCP and the other very common protocol UDP will have its own dedicated section. Regardless, the destination port is 443 which is reserved for HTTPS traffic. Again, the source port information and other TCP-related information will be covered layer but what is important here is the HTTPS protocol and destination port 443.
LAYER 3: Now we are entering well-known territory. This is the Network Layer. We are dealing with IP addresses here. Our client wants to connect from his IP address to the web server’s IP address.
LAYER 2: Again this has been covered. This is the Data Link Layer. This is all MAC addresses (physical addresses). Our client’s MAC is trying to reach his routers MAC.
LAYER 1: This is all physical ports and copper connections.
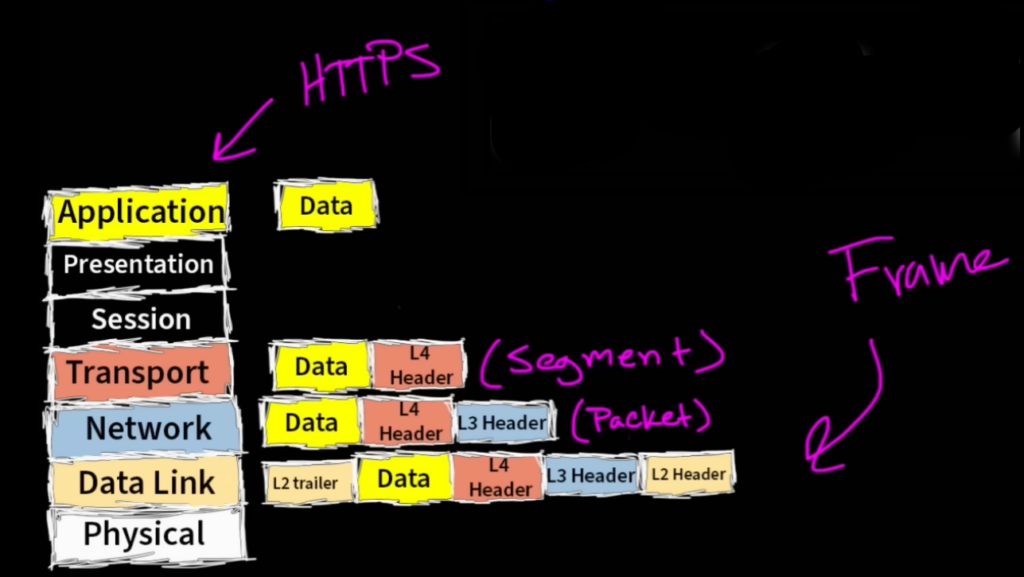
What’s important to see here is when this frame is being created a process called encapsulation is being done. Starting from when our client’s computer started with the HTTPS protocol in Layer 7. Our client created some HTTPS data which was encapsulated into a HTTPS header for Layer 7. Likewise, every time we slap on more data headers for each layer encapsulation is done. Simply, we can think of encapsulation as our starting HTTPS data is stuffed into a “envelope” and then from that envelope we stuff it into another envelope which would be the transport layer, and so on. When looking at the transport layer we call this a segment. A good visualisation of this can be seen below

Once all these processes are complete it hits the wire onto the switch. Remember that the switch CANNOT see anything past Layer 2. The switch sees this as a frame. The rest of the packet data is there but the switch does not deal with anything past Layer 2 so it passes it along to the router. This can be seen below.

Now the router received the frame. The router though can see Layer 3 which deals with IP addresses. The router does this by a process reverse to encapsulation; de-encapsulation. At this point, the router can call this a packet and can see where it needs to go from there as seen below. Another thing to note here is as seen in Out Layers, the MAC addresses have changed. This HAS to be done in order to route the frame to the example.com’s server NIC MAC.

Another thing to keep in mind is when the web server receives this frame/packet. It first starts from bottom to top, so Layer 2 all the way to 7. All NIC’s have to have their drivers compatible with this TCP/IP model in mind so it can de-encapsulate/encapsulate frames properly.
